This was my tutorial inspiration:
It seemed easy enough. I even took the time to take some picture along the way, so here goes!
So, instead of fabric, I used ribbon purchased to match the dress I'm wearing next week to a holiday party (see this post to see the dress and matching necklace I made).
I found the center line of the front of my sweater by folding it in half and placing a pin. The fact that it is a rib knit made it that much easier. Measure out the ribbon to be a bit longer than the sweater from neckline to hem. I actually ended up using an even longer piece than shown here. My first attempt had stretched the knit a little too much and I ended up with a too short piece of ribbon. So, don't skimp here!
Ok, take a deep breath and start cutting up that sweater. For me, this was the hardest part.
Place the ribbon along the edge of the front of the sweater cut line, folding over about an inch of the ribbon over the top of the neckline, and sew. I used a basting (longest length) stitch which helped reduced the amount of stretch in the sweater. When you get to the bottom, fold over the remaining bit of ribbon. This will all be enclosed in the next step, so don't worry about the ends of the ribbon fraying.
Can you see the stitching? Now, fold over the sweater and ribbon so that both are on the inside of the sweater. Sew back down on the inside. I used a thread that matched the sweater so that from the front, you can't even see it. The second line of stitching is the bottom line shown in the picture below. Trim all of your threads.
If you want, that's pretty much all you need to do. You could add some buttons or toggles as the inspirational blogger did for hers. I wanted something a little dressier, so I attached pieces of ribbons to the inside top corner using an X/box stitch (sorry no picture). This was actually the too short ribbon I cut first, so nothing was wasted! I did heat seal the ribbons by waving them near a candle flame. You could also use fray check if you have some on hand.
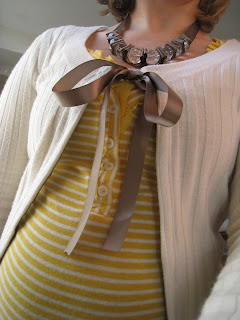
Here's the finished product! Complete with matching necklace!
I think it shows off my bump quite nicely!
(haha, don't mind the sweatpants in this picture!)
All in all, this was actually pretty easy.
I might have to go through my closet now and see what I can start refashioning!


That came out so good!!! I love the necklace too. But I love the baby bump the most ;)
ReplyDelete