Showing posts with label pinterest review. Show all posts

Thursday, December 15, 2011

Booo Booooo Rice Pack

After making the adult version, I thought it would be cute to make some kiddo rice packs.  They may not have the aches and pains we adults do, but they often bump heads or need a tummy soothed, right?

There are tons of these on Pinterest, but after making the adult version, I didn't look up any for my owl version.  They are really easy to make and I think I might make a few more for some special tots!

Using a Christmas card from years past (that conveniently had an oval on it), I messily adjusted the shape to be a little more squared off to make a template.

I then folded it in half and cut out my design so that it would be symmetrical.  Using this template, I cut out cotton fabric for the front and flannel for the back.


For the wings, I made a half heart shape, folded my cotton fabric in half and cut out the wings through the two layers so that I had one wing for each side.


For the eyes, I had a circle template with a 1.75" diameter, but in the future will probably use a 1.5" diameter as these were a bit two big.  For the center of the eyes, I cut 1" squares out of flannel and then rounded off the corners.


Here (above) is what the pieces look like assembled.  Using a zig zag stitch as close to the edge as possible, I then attached the blue circles to the white circles and then attached these to the body.  Then I attached the wings.
With right-sides together, I sewed the front and back together using a short stitch with a 1/8" seam allowance, leaving the bottom open for filling.  I did use my turning trick here too to make turning and closing easier.


This is the final product after filling with approximately 2 cups of uncooked brown rice and sewing the opening at the bottom closed.  Even though B said it looks like an owl, I think I need to go back and hand stitch a beak on.  I do like the mix of fabrics and colors though.

We haven't tested this out yet.  I thought to myself "T doesn't hit her head all that much" and sure enough, later that day, she bumped her head!  Lesson learned, this little guy will find a cozy nest inside a ziploc bag in the freezer so that he's ready at a moment's notice!

Monday, December 5, 2011

Sweater Refashion Review

So I finally took the leap and did a sweater refashion into a cardigan.  I needed a winter weight cardigan for some upcoming events and I had a sweater that I just won't wear that often anymore (never mind that fact that it won't fit over my belly right now!).  It's super soft and a great winter white, so I took the plunge.

This was my tutorial inspiration:

It seemed easy enough.  I even took the time to take some picture along the way, so here goes!


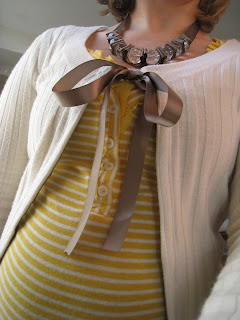
So, instead of fabric, I used ribbon purchased to match the dress I'm wearing next week to a holiday party (see this post to see the dress and matching necklace I made).


I found the center line of the front of my sweater by folding it in half and placing a pin.  The fact that it is a rib knit made it that much easier.  Measure out the ribbon to be a bit longer than the sweater from neckline to hem.  I actually ended up using an even longer piece than shown here.  My first attempt had stretched the knit a little too much and I ended up with a too short piece of ribbon.  So, don't skimp here!


Ok, take a deep breath and start cutting up that sweater.  For me, this was the hardest part.
Place the ribbon along the edge of the front of the sweater cut line, folding over about an inch of the ribbon over the top of the neckline, and sew.  I used a basting (longest length) stitch which helped reduced the amount of stretch in the sweater.  When you get to the bottom, fold over the remaining bit of ribbon.  This will all be enclosed in the next step, so don't worry about the ends of the ribbon fraying.

Can you see the stitching?  Now, fold over the sweater and ribbon so that both are on the inside of the sweater.  Sew back down on the inside.  I used a thread that matched the sweater so that from the front, you can't even see it.  The second line of stitching is the bottom line shown in the picture below.  Trim all of your threads.


If you want, that's pretty much all you need to do.  You could add some buttons or toggles as the inspirational blogger did for hers.  I wanted something a little dressier, so I attached pieces of ribbons to the inside top corner using an X/box stitch (sorry no picture).  This was actually the too short ribbon I cut first, so nothing was wasted!  I did heat seal the ribbons by waving them near a candle flame.  You could also use fray check if you have some on hand.


Here's the finished product!  Complete with matching necklace
I think it shows off my bump quite nicely!


(haha, don't mind the sweatpants in this picture!)

All in all, this was actually pretty easy. 
I might have to go through my closet now and see what I can start refashioning!

Friday, December 2, 2011

Pinterest project reviews

Poor little T was sick today, which meant that I got to stay home with her.  Our morning was fun, filled with decorating for Christmas and playing with "Mummy" and "Daddy" (basically any human like form in plastic, fabric or wood).  Once she went down for her nap though, I was all business!  I've felt lately, like I have a hundred different projects started and none finished.  I was determined to check many of those off my list.  As it happens quite often lately, many of these projects were Pinterest inspired, so I'll give a little review for you!

My inspiration:
Source: youtube.com via Melissa on Pinterest


My results:


The hardest part of this project was getting the coat hanger untwisted and shaped and keeping the ornaments attached to their caps!  I love how it turned out.  For $15, I bought 50 ornaments from Target that were the perfect amount.  The ribbon I purchased from Michael's for $4.99 and I have plenty left over for other random projects.


The holiday season is upon us.  I've shared previously my woes of trying to find a maternity dress that is appropriate and dressy enough without costing $100+.  Well, I found this dress at Old Navy:


Source: oldnavy.com via Melissa on Pinterest

But seriously, I'm only going to wear it once.  I'll have to figure out how to refashion it afterward!  Anyways, the taupe is kind of a hard color to accesorize or match, so I figured I could make a necklace with ribbon I found (that was the perfect match) and large clunky plastic beads.  My original plan was to thread the ribbon through the beads, but without drilling larger holes, that wasn't going to work.  Then I found this tutorial:


I wasn't so sure how this would turn out for a dressier look, but I absolutely love it! 
Check it out!


Oh pinterest, how you have come through for me again!  I'm working on a sweater into cardigan refashion complete with step by step pictures.  Hopefully I'll get that uploaded this weekend.

I also hope to check off more project this weekend as B is working and I'll have two naps (Sat and Sun) to get things done!
               

Little update, I wore this necklace out last night.  I just loved the look and feel of it!  Well, Miss T did too and was playing with it while we were waiting for our food at Panera.  I probably should haved used stronger thread (I used two strands of invisible thread) since she snapped it right off and beads went flying everywhere!  Luckily, we retrieved every single bead, so I can remake a stronger 2.0 version of this necklace.