I know, I know, I'm keeping you all in great suspense waiting for the big reveal of our brand new guest bathroom. I made the shower curtain last night and we are putting on some finishing touches during the next week. Oh yeah, and I'm defending my thesis on Friday, so bear with me, ok?
Have I also mentioned that I'm nearly 35 weeks pregnant!!??!!?? It's really starting to take a toll on me.
(Haha! If you know my research, you'll get that last pun. Hah! I really do make myself laugh. Toll.)
Anyhoo (wipes tears from my eyes), I'm starting to feel the itch to get ready for labor and delivery, oh and to bring that new little bundle of joy home. Have I mentioned that we still don't have a crib for her yet, the bassinett is in RI, and nothing is assembled or ready? Nothing like waiting for the last possible second, right?
Anyways, my life is dominated by lists right now; lists of things to study, lists of papers to read, lists of changes to make to my thesis/presentation, shopping lists for Baby Girl #2, etc. The one I thought I could handle yesterday was the list of things to pack for the hospital. I only got as far as the list itself. I can barely remember what I packed last time and whether or not I needed any of it! I consulted a few online lists and here is what I came up with. What do you think? Am I missing something huge? Am I packing WAY too much? Help a girl out and let me know, ok? (they are in no particular order, kind of like my days lately!)
PJ's
Grannie underwear (oh, the joy)
snacks
glasses, Contacts, solution, case
hairbrush, elastics, hairspray
slippers
nursing tanks, yoga pants
Big Sister gift
going home clothes (Me and Baby)
receiving blanket
flip flops
toiletries
Nook (with a new book on it for me)
nursing pads
lip balm

Tuesday, February 21, 2012
Thursday, February 16, 2012
Guest Bath Reno - Day One
Day Two:
This day was spent mostly taking things down and tearing them apart! Woohoo! The vanity, tub, medicine cabinet and most of the yellow linoleum is gone!
Come in, take a look:


Looking studly! (Ha! Haha! I crack myself up!) Ahem, here is where the tub/shower will be replaced.

On the opposite wall, the vanity, cabinet, and toilet are gone!

This day was spent mostly taking things down and tearing them apart! Woohoo! The vanity, tub, medicine cabinet and most of the yellow linoleum is gone!
Come in, take a look:

Like I said yesterday, there was a small amount of damaged wood. Not too bad for being over 30!


On the opposite wall, the vanity, cabinet, and toilet are gone!

The goal for tomorrow is to finish removing the yellow flooring from the hall/laundry, get the tub installed, repair walls, etc. Its nice to see so much accomplished already! Oh yeah, and in order to get out the rest of the yellow, the washer and dryer will take up a temporary residence in our bedroom for a few days. Nothing says romance like laundry, right?!
Wednesday, February 15, 2012
Bathroom renovation - before pics
Our bathroom renovations have begun. The first of two bathrooms has been demo'd, old fixtures and flooring removed, and upgrades are already taking place.
However, as promised, here are some lovely before pictures so we are all aware of what we are dealing with! And, I didn't even clean up or oganize first, so you are seeing it in all its day-to-day loveliness.
First, our lovely, guest "Bathroom Under the Sea". Why do I call it that? Because of this chic wall paper border:

I know, I know, you are are wondering how you can get your hands on that timeless, classic, border. My only regret is that we couldn't replace the entire wall with repeating patterns of sea horses and underwater foliage. But don't worry, it only gets better.

Yep, that is pure, 100%, 80's style, yellow linoleum flooring, from the hallway/laundry all the way into the bathroom. Gorgeous! Unfortunately, it is showing signs of wear and tear and must be replaced. Sniff. I will miss you mustard yellow floor! You might also like the two-tone vanity. You can't tell from this pic, but the side is painted white to "match" the linoleum top. And, to top off all the use of linoleum in this space, the 3 inch linoleum "molding".
Well, it's gone. It's all gone! Everything in here has been ripped out, including the overlapping shower doors. Those doors overlap because the space for the tub isn't a standard length. This bathroom is being redone first, with tile floors, new tub, vanity, light fixture and toilet, tile walls in the shower, etc. Can't wait to experience it!
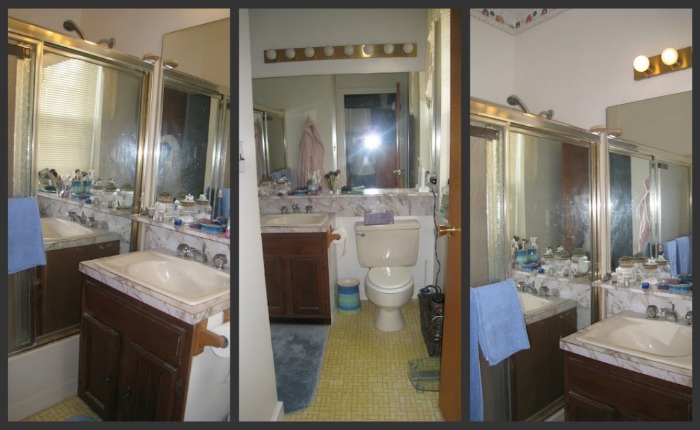
But, the excitement isn't over! Here is our "Four Seasons" bathroom, to be renovated two weeks after the first.

I know, again, I'm sad we can't have this lovely trim as a repeating pattern over the entire wall. Moving on...

You're loving the brass fixtures, aren't you? And, yessir, that yellow linoleum found its way in here too! Yay. Now, you can definitely see the two-tone vanity. Nice, right? What you can't see is the rotting "wood" and the peeling paint. For now, this bathroom is meeting the needs of our entire family. Can't wait until next week when we can try out the new bathroom and get ready to gut this one!
Coming up, day by day progress of our bathroom renovations, including reviews of our contractor. So far, he's been an amazing one-man show! One I get his OK, I'll post his information for any other local homeowners looking to update their kitchens or bathrooms. If his work continues in the same manner, we'll likely be hiring him to redo the kitchen in our rental space. How's that for an endorsement?!
However, as promised, here are some lovely before pictures so we are all aware of what we are dealing with! And, I didn't even clean up or oganize first, so you are seeing it in all its day-to-day loveliness.
First, our lovely, guest "Bathroom Under the Sea". Why do I call it that? Because of this chic wall paper border:

I know, I know, you are are wondering how you can get your hands on that timeless, classic, border. My only regret is that we couldn't replace the entire wall with repeating patterns of sea horses and underwater foliage. But don't worry, it only gets better.

Yep, that is pure, 100%, 80's style, yellow linoleum flooring, from the hallway/laundry all the way into the bathroom. Gorgeous! Unfortunately, it is showing signs of wear and tear and must be replaced. Sniff. I will miss you mustard yellow floor! You might also like the two-tone vanity. You can't tell from this pic, but the side is painted white to "match" the linoleum top. And, to top off all the use of linoleum in this space, the 3 inch linoleum "molding".
Well, it's gone. It's all gone! Everything in here has been ripped out, including the overlapping shower doors. Those doors overlap because the space for the tub isn't a standard length. This bathroom is being redone first, with tile floors, new tub, vanity, light fixture and toilet, tile walls in the shower, etc. Can't wait to experience it!
But, the excitement isn't over! Here is our "Four Seasons" bathroom, to be renovated two weeks after the first.

I know, again, I'm sad we can't have this lovely trim as a repeating pattern over the entire wall. Moving on...
You're loving the brass fixtures, aren't you? And, yessir, that yellow linoleum found its way in here too! Yay. Now, you can definitely see the two-tone vanity. Nice, right? What you can't see is the rotting "wood" and the peeling paint. For now, this bathroom is meeting the needs of our entire family. Can't wait until next week when we can try out the new bathroom and get ready to gut this one!
Coming up, day by day progress of our bathroom renovations, including reviews of our contractor. So far, he's been an amazing one-man show! One I get his OK, I'll post his information for any other local homeowners looking to update their kitchens or bathrooms. If his work continues in the same manner, we'll likely be hiring him to redo the kitchen in our rental space. How's that for an endorsement?!
Friday, February 10, 2012
Nursery Letters DIY
Two years ago, I purchased letters to spell out Miss T's name for her bedroom wall. I painted them brown and then decorated them with pink, green, and white acrylic paint. The thing I liked best about this type of project is that its easy to change up the look of the letters. Since I purchased them from a craft store unfinished, I knew that when the time came to change the look, I wouldn't feel bad since I didn't spend a lot of money on them.
Well, I got the itch to change things up. And, being as neurotic as I am, since the girls will be sharing a room, I wanted their letters to match. So, I picked up a bunch of coordinating scrapbook papers and dove right into my first ever project with Mod-Podge.

Miss T's old letters.

I played with the order of the papers for a while until I found an arrangement that I liked.

Having assigned a pattern to each letter, I traced the letter face down on the back of each page. That way, when cut out, the front of the page would match perfectly with the front of the letter. After tracing, I carefully cut out each letter, some being easier than others!

Apply a thin coat of Mod-Podge to the letter...

And then layer the cut out paper over, taking care to smooth out any bubbles as you go.


For each letter, apply a coat of Mod-Podge over the paper and let dry for 15-20 minutes. I did 3 coats per letter. In between, to make the time go faster and feel more accomplished, I did a small chore around the house, laundry, took Dru outside, etc.

And voila! The Mod-Podge dries clear and seals the paper to the letter. I let them dry for about an hour after the final application and then rehung them on T's wall. I hope she likes them! Now, onto BabyGirl#2's name!


Monday, February 6, 2012
Salt Dough
We were having B's cousin and his family over one afternoon for a playdate/dinner. I figured, with two toddlers, I better have some activity planned! Home made salt dough!
Ingredients:
flour
salt
warm water
food coloring

Use a 2:1:1 ratio for the ingredients (flour:salt:warm water). So for each cup of flour, use 1/2 cup of salt and a 1/2 cup of water. I wanted to make a few colors, so I did smaller portions. Mix up the flour and the salt.

Add food coloring to warm water, about 6-10 drops depending on how bright you want it to be.


I portioned it out for T and JT so that each had a sample of each color and then I rolled it flat onto parchment paper and sealed it with plastic wrap until we were ready.

Gather up some cookie cutters and have fun!

They had a blast!


Ingredients:
flour
salt
warm water
food coloring

Use a 2:1:1 ratio for the ingredients (flour:salt:warm water). So for each cup of flour, use 1/2 cup of salt and a 1/2 cup of water. I wanted to make a few colors, so I did smaller portions. Mix up the flour and the salt.

Add food coloring to warm water, about 6-10 drops depending on how bright you want it to be.

Mix it up, and knead by hand. After doing yellow, blue and green, I had no food dyes on my hands. Sweet!


I portioned it out for T and JT so that each had a sample of each color and then I rolled it flat onto parchment paper and sealed it with plastic wrap until we were ready.

Gather up some cookie cutters and have fun!

They had a blast!


Subscribe to:
Posts (Atom)